
Why timed feeders are a valuable tool
Time delay feeders are a fantastic tool for animal care staff to use as many animals in an institution have the tendency to adapt their routines and schedules around their caretakers. Timed feeders allow animal care staff to essentially provide enrichment and foraging opportunities when they are not physically there, which can be immensely useful when your not able to spend all day with one specific animal or are only able to enter their exhibit a few times in the day. For example, this timed feeder was set up for a pair of Grizzly Bears which, with the use of a trail camera observing them for several days, we learned had become very habituated to being fed in the morning around 9-10am and again at around 5pm. We observed on the camera footage that the bears were staying in their back holdings until after the keepers had put their morning food out and were going back into their back holding areas after they had finished eating their second meal of the day. In the wild Grizzly Bears tend to adapt their schedules throughout the year to match food source availability and tend not to have a ridged schedule for most of the year, we wanted to emulate this by using the times feeder to provide food items in the middle of the night to break up the bears routine. As I have talked about several times, it is critical to start any enrichment project with a clear goal that is both measurable and specific, for this project we could use the trail camera to measure activity both before and after the time delay enrichment feeder was added which allowed us to have a very clear measure of success as we could observe whether or not we had broken the bears activity patters at all.
Build Materials
- Container that can be tipped and hold food. Can be a tote, PVC tube or other container.
- PVC pipe or another material to make the mounting frame
- Airline cable or another strong cable/ rope
- Cable crimps if using airline cable
- Pulley
- Bleach jugs or large water bottles/ milk jugs
- Catheter line with flow controls
- Mounting hardware (will vary by situation)
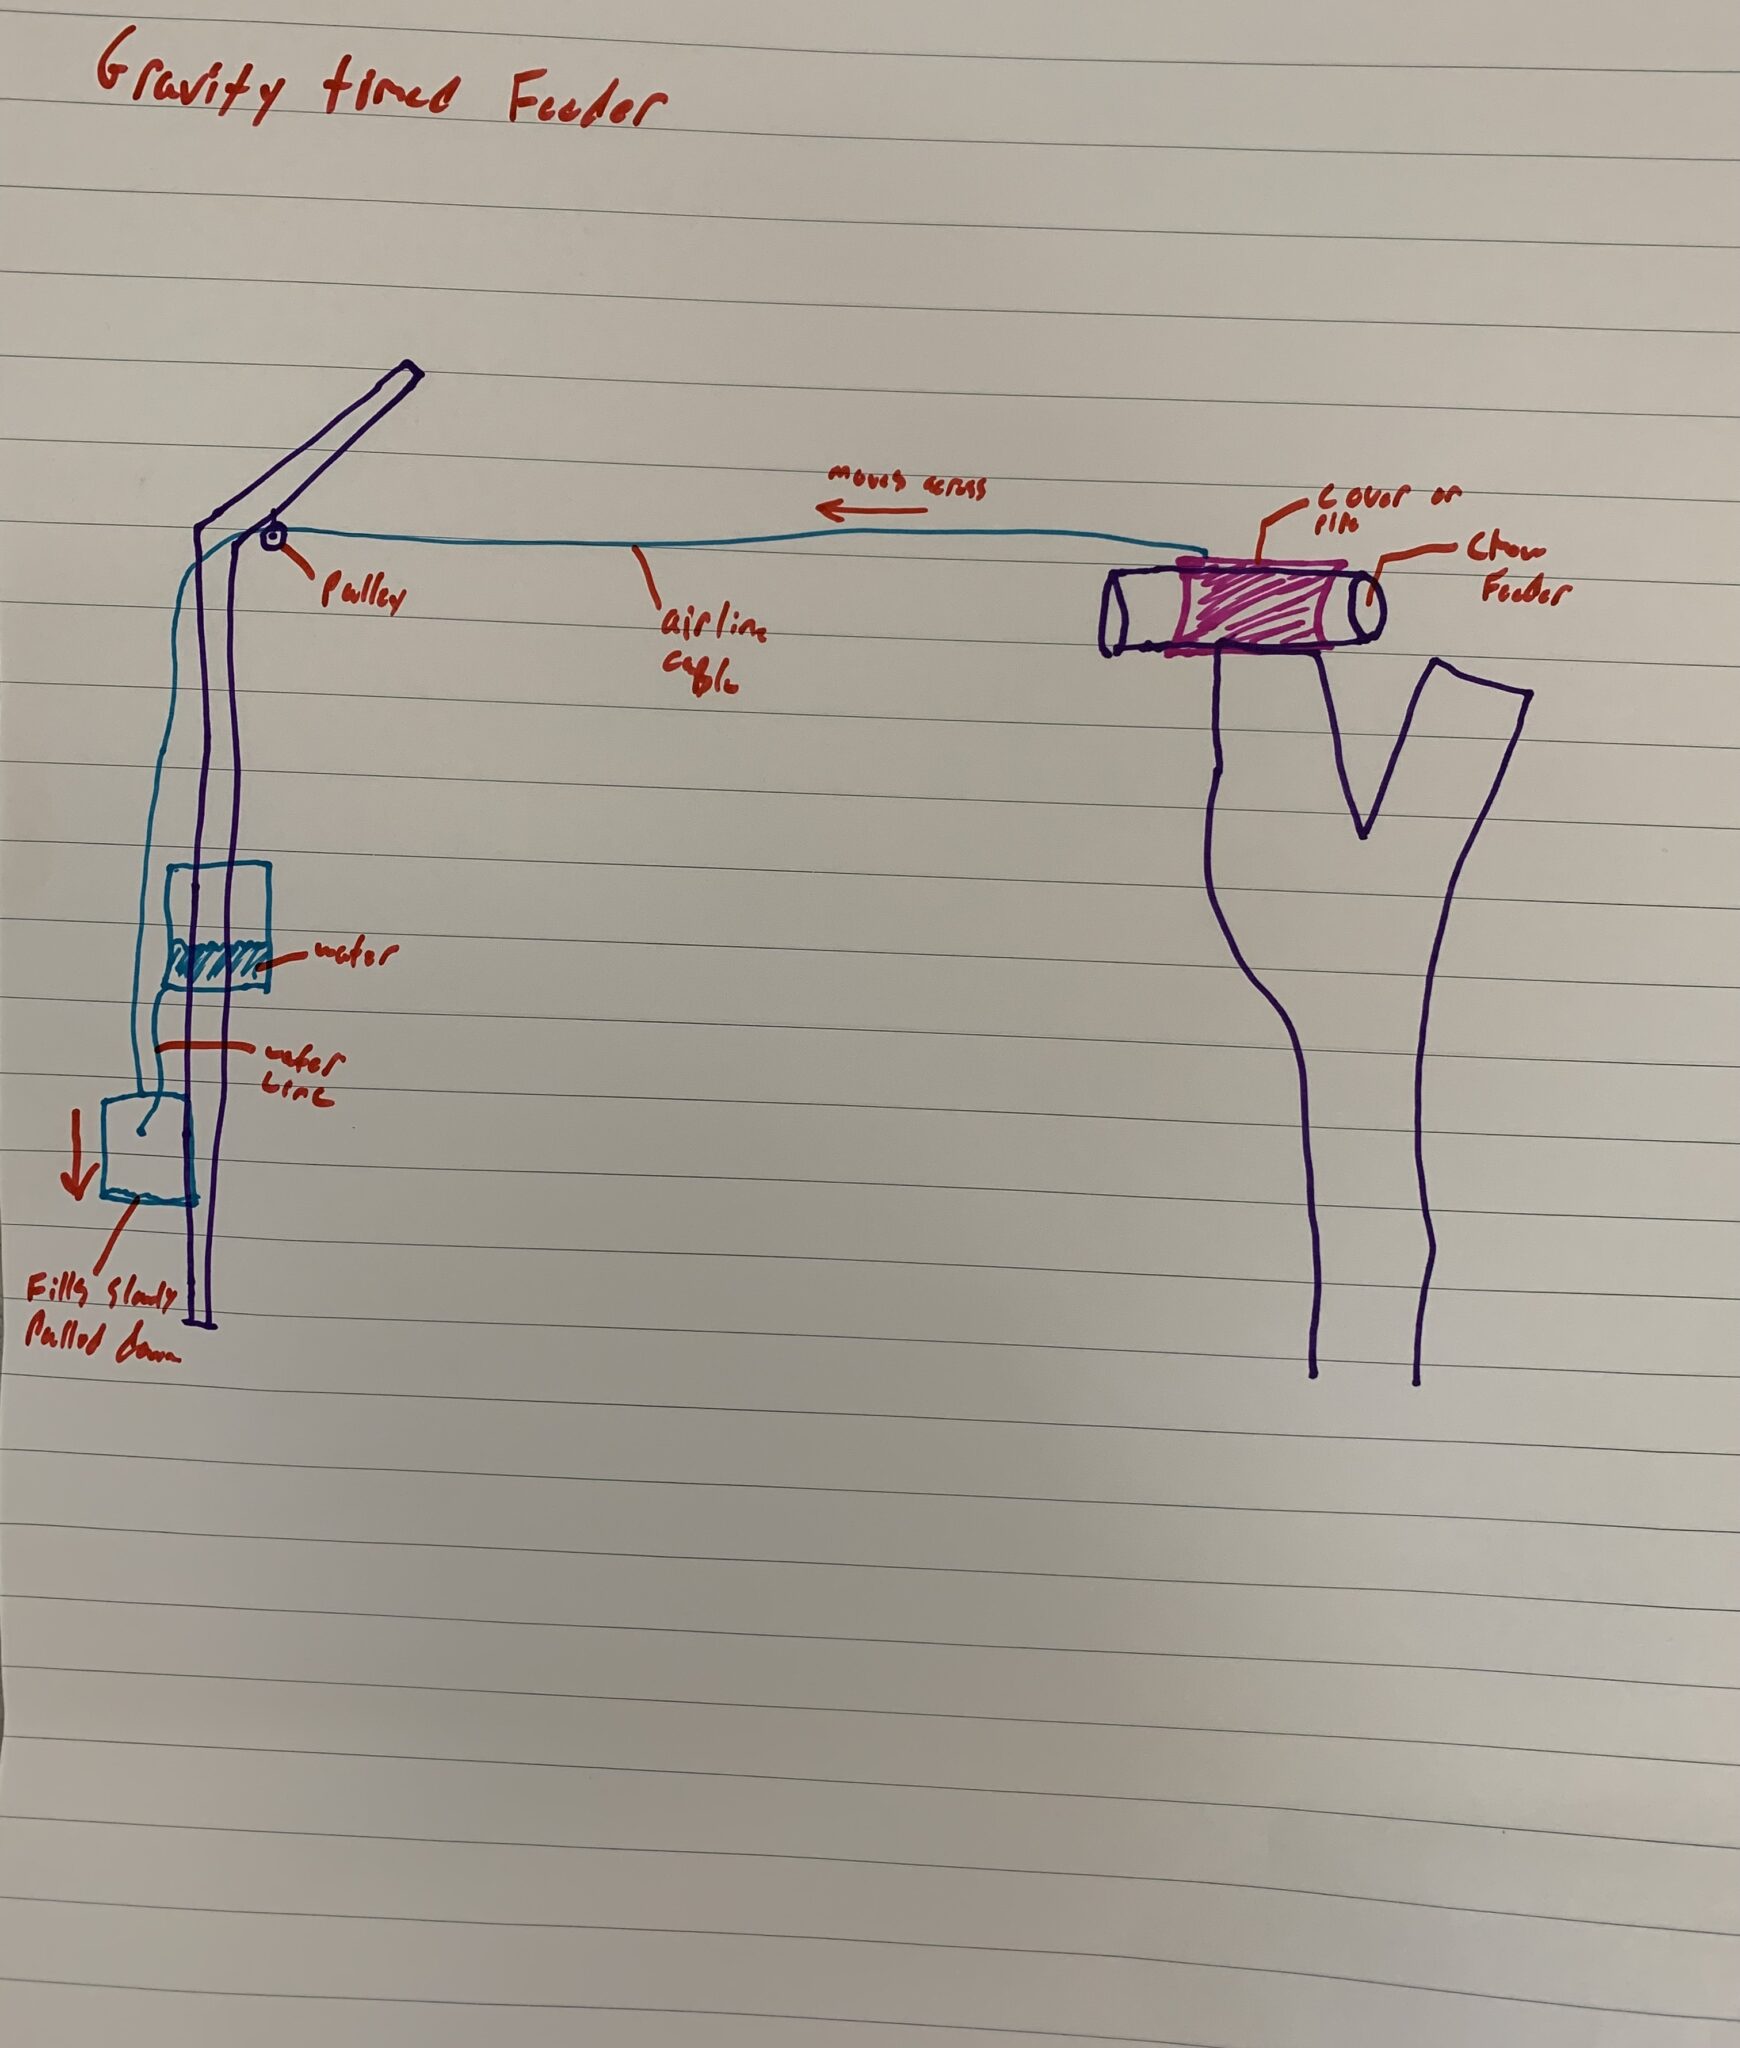
Here is the initial concept image I drew to get an idea of the mechanism and how everything is going to come together. I initially wanted to do a sort of PVC slow feeder to hold the food, but I found a large circular plastic bin that would make for a much easier mechanism for holding food. This is a good example of using the Minimum Viable Product concept that we have talked about before in previous articles, its always better to simplify an enrichment project so you can actually get it done as opposed to overcomplicate it and never finish it. Essentially, there is a large dead tree in the bear exhibit that we will be mounting the food bin to, this tree is also relatively close to the fence line, which will allow us to put the time delay mechanism on the other side of the fence allowing for safe and easy resets even when the bears are on exhibit.
Building Steps
This build project is relatively complex when looked at as a whole, but when broken into specific parts, is really not that challenging, so we are going to break it up into two parts: The Food Container, and the Time Delay Mechanism.
The Food Container
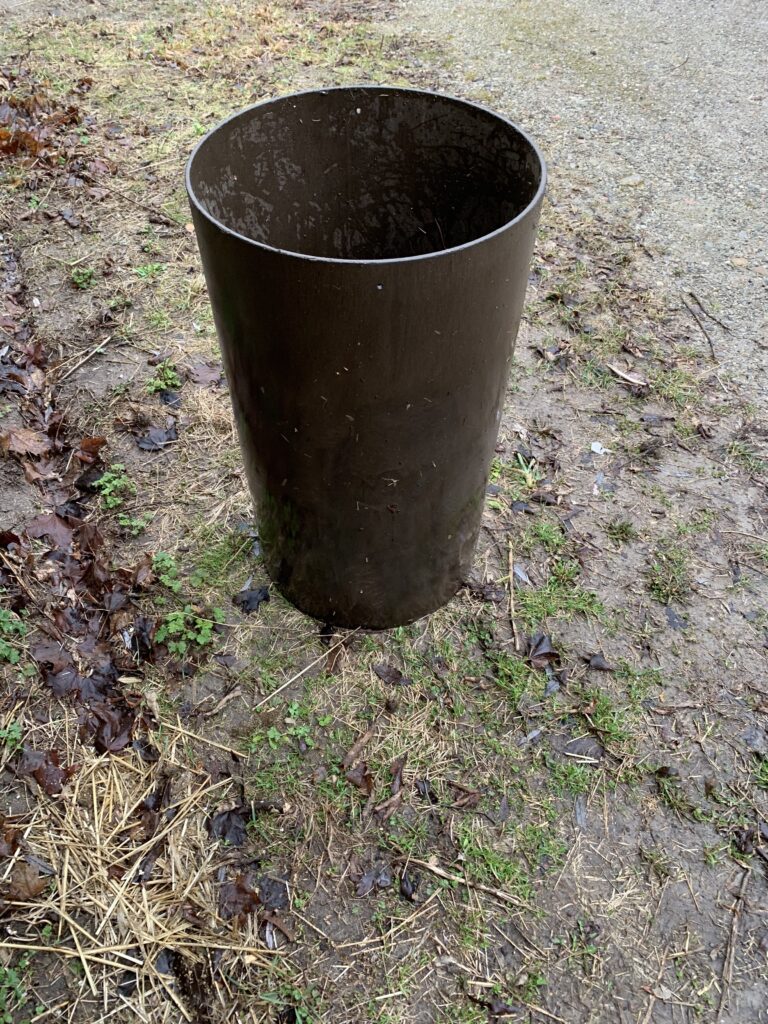
- The first thing that needs to be done for this build project is to find the container that will hold the food items you want to delay the feeding of. As I have mentioned earlier, the simpler the design the easier it will be for you to complete this build. I went with this circular tub as it was quite large but also light enough that it wouldn’t be too much of a challenge to mount to the tree.
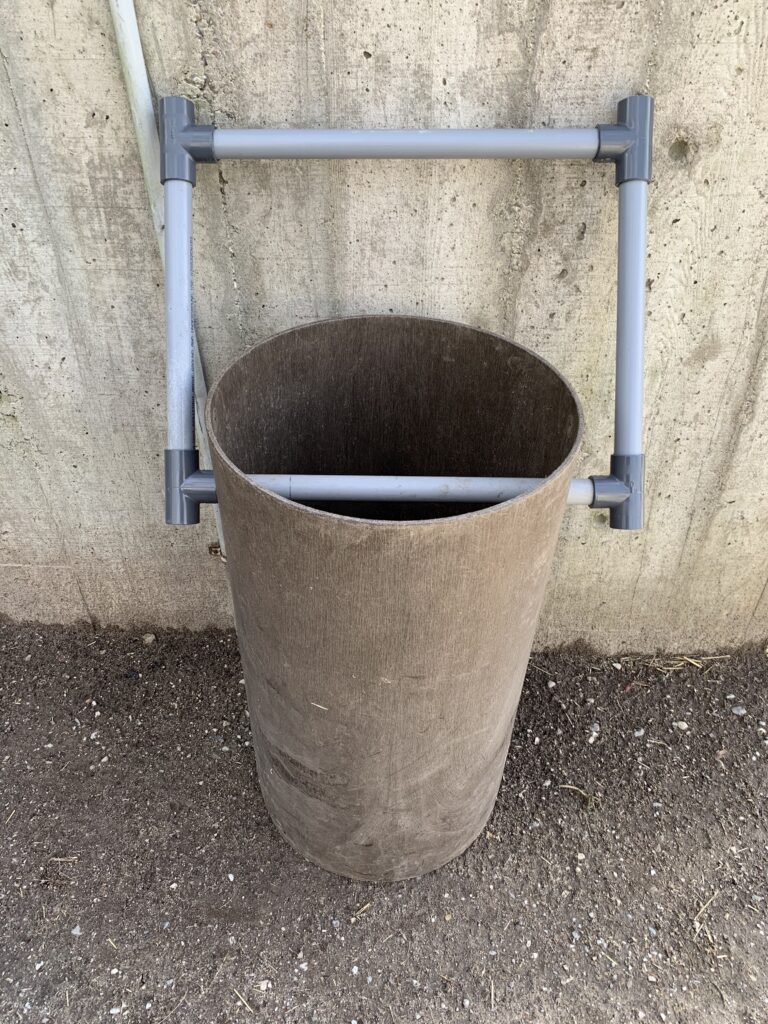
- Then I cut and glued a simple square bracket out of PVC pipe and elbows, when glued with PVC glue, the pieces will essentially melt together and be incredibly strong and will be easy to mount to a tree, while still being able to rotate freely. This bracket will also allow the airline cable to go over the top rung and not become tangled in the mechanism.
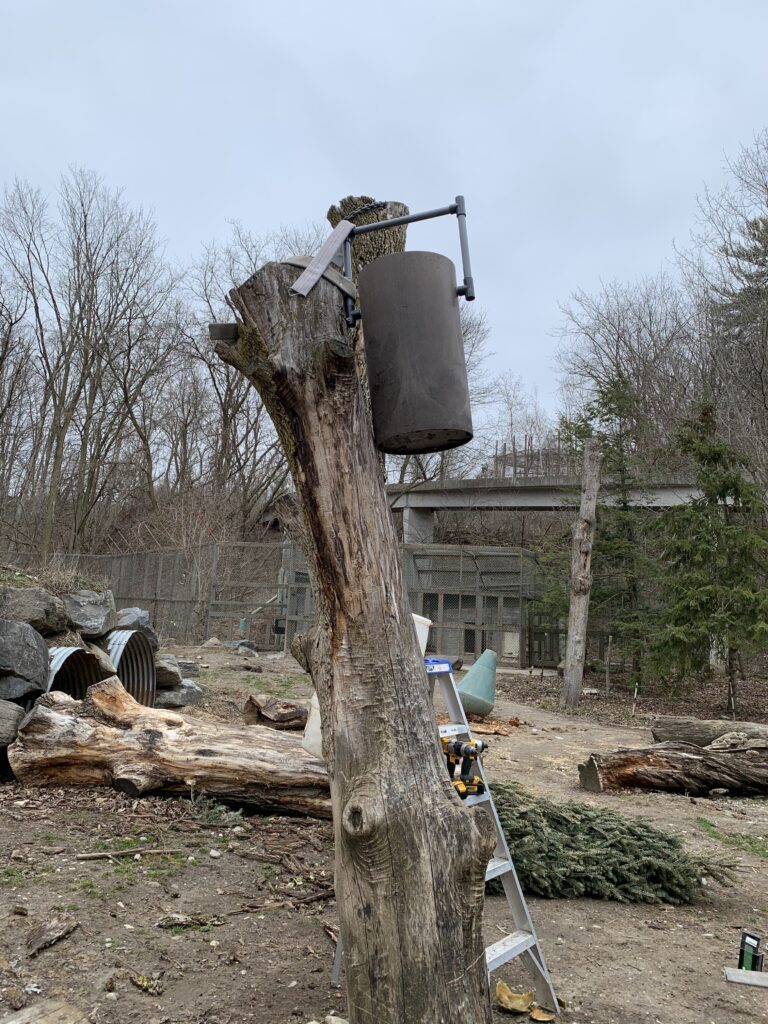
- By far the hardest part of this build is figuring out how to properly mount this bin to wherever its going in the animals exhibit. As you can see, ours was mounted to a large dead tree in the Grizzly exhibit, this was particularly challenging because there was no flat spots on the tree and it needed to be 10+ feet off the ground so that the large male bear could not reach it on his hind legs, if you have a fence post or a flat platform this would be much easier to mount. We managed to mount It using metal straps as well as firehose straps to the tree, which made it surprisingly stable.
- After the bin is mounted, you are going to want to test the tipping motion and make sure that it moves freely and unobstructed. Then you can drill and place an eye hook where you want the cable to attach and move it, keep in mind that where this attachment point is placed will have a large effect on how easy the bin is to tip as it will either lengthen or shorten the moment arm.

The Time Delay Mechanism and Cable System
- Next we have to set up the simple time delay device. This is a syphon system, where one jug is filled with water and is stationary, the next jug slowly fills with water via a catheter line. This jug is attached to the airline cable that is attached to the food bin, as it fills with water it will pull more and more on the bin, until it is heavy enough to tip it over. It’s important in this stage to do as much testing as possible. You want to get an idea of how heavy the jug needs to be in order to tip the bin you have set up, you also want to experiment with the catheter line flow to see how long it will take to fill the jug up to the desired weight, you can adjust the “brakes” that the catheter line will have built into it to slow down or speed up the flow. We found that we could get around a 6 hour delay when we had the line on a relatively slow drip. You also want to find an easy way of starting the syphon water flow. We found a large syringe could be placed on one end and drawn until the water began to flow.
- Once you have done some experimenting and are happy with the jug setup, you can then create attachment points on the jugs so that they can be attached to the airline cable. I made simple airline cable rings around the handles of the jugs so that with a carabiner attached to the airline cable, the jugs could easily be swapped out when one fills up and the other empties.
- The next thing you need to do is run the cable from the food bin to the water jugs. How you do this is going to vary depending on how the exhibit that you are installing this in is set up. For this exhibit, I was able to attach a pulley onto the metal fence poll and run the line to the bottom of the food jug, over the bracket, to the pulley and down at a 90 degree angle to the jugs on the other side of the fence. As I said before, (especially if working with protected contact animals) having the timing mechanism on the other side of the fence is a good idea as it allows you to reset the mechanism without having to call the animals off exhibit.
Now that everything is built and hooked up, the only thing left to do is try it out! It may take a few tries to actually get it to work properly as it can be a finicky mechanism, but once you have it worked out, it’s a reliable way to delay feeding in a variety of animals.
Evaluation and Goals
As with any new enrichment device, you want to do initial and continuous evaluation of its effectiveness to ensure it is still enriching. We built this enrichment item in order to break up the grizzly bear daily routine in hopes of getting them to forage for food at times other than when we were there to feed them. In order to assess whether or not we had done this successfully, I set the trail camera back up for a few nights after we had the device set up to see if we could see any activity at night or early in the morning.
One of the first nights we set up the trail camera we captured a video of the female Grizzly Bear foraging for the food that was dumped out in the night a few hours outside of her normal activity window, therefor, our time delay feeder was deemed a success. In order to continuously monitor the effect the timed feeder will have on the bears, the trail camera will be set up throughout the year.
Tips/Comments
The various applications of this DIY timed feeder are basically endless. This design can be adapted to:
- Feed hay at a later time
- Dump fish into a pool
- Release scent enrichment
- Release food items in puzzle feeders
- Be paired with a puzzle feeder or other enrichment devices to dump food into them
Just to name a few. This design concept can be adapted to work with almost any animal in almost any exhibit. Go try it out and get creative!
If you’re having trouble with the design and want some more information, I would be happy to help. Simply send me an email to [email protected], go to the contact us page on this website or send Wild Enrichment a message on Facebook or Instagram.